Reverse Engineering a Unit in Project Based Learning
Project Based Learning (PBL) requires designing projects that teach the skills that encompass a unit. In this article we'll be breaking down one of my units and projects from the second half of my intro class. It's important to note that this is NOT project based assesment. This is Project Based Learning. While we do use the project as an assesment tool, the project itself is the guiding force for instruction. Often times PBL gets confused as an assesment tool at the end of a unit rather than being the unit.
Unit Design
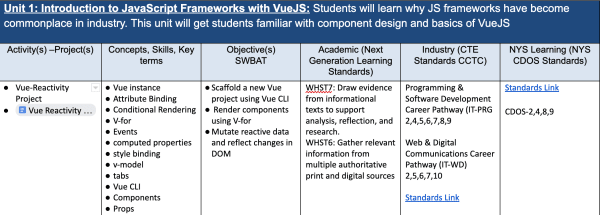
The above screenshot shows my first unit of term 2. An introduction to JavaScript frameworks with VueJS. I begin every unit by identifying the skills I want students to learn during that unit.
Once the key skills have been identified we can begin to design a project that encompasses those skills for the unit. For this unit I created the "Vue Reactivity Project". The project asks students to develop an application that changes the user interface based on input by the user. It's key to have demo project that meets the criteria to show the students. In this scenario I show a pizza builder app I made that changes the image of the pizza based on the ingredients clicked.
Starting the Unit
While I use both PBL and self-paced learning strategies, I still begin units much like every other teacher. PBL and self-paced learning are not mutually exclusive with teacher directed lessons. In this unit we beguin by discussing the pain points of previous projects in JavaScript and introducing how frameworks like VueJS alleviate those issues. I demo some code written in Vue and compare/contrast that code with vanilla JavaScript code. This demo shows why we are learning this framework while also building motivation from students as they often find a lot of the Vue syntax/methods more appealing than vanilla JavaScript.
Now that I've answered the why of the unit with the class we can move onto introducing their project. I give them the rubric and go over the demo project and how the rubric's skills are present in the demo project.
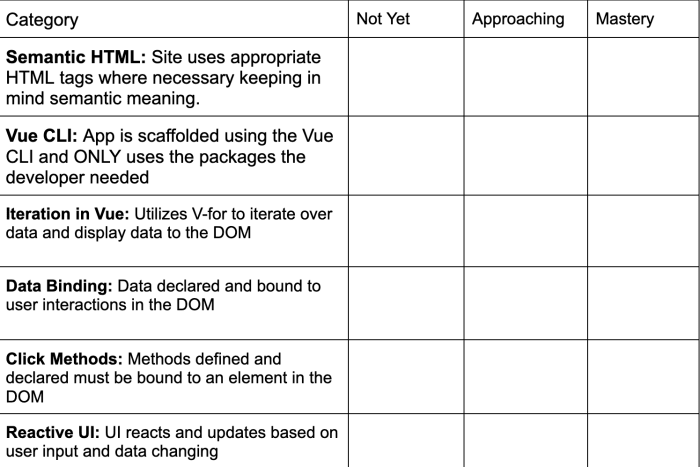
The above rubric is cut off but you can see some of the skills being assessed. Each skill is identified in the rubric and again in the demo to help students make those connections.
Next Steps
Once the students have an idea of what skills they should be learning and their project goal, it's time to let go of the reins. At this point they have the option to brainstorm project ideas or beging watching my videos explaining the skills. Each video is between 3-7 minutes long and details one skill. As the students begin brainstorming or exploring the skill, I begin talking with students 1 on 1 and helping them develop a project idea that meets the rubric.
Over the course of the next week or so I'll continue to answer questions, conference with students, and identify shared concerns/misconceptions. If I noticed trends emerging in misconceptions/struggles in concepts then I will grab the class and demo the skill again. It's important to try to check in with as many students as possible to identify common misconceptions quickly.
Summative Assesment/Final Steps
Now that we have reached the end stage of the project, it's important to remind students to check the rubric and verify they are meeting the standards you have set. Many times students will ignore the rubric once they begin and will need reminding that they need to achieve Mastery in each category. I check in towards the end of the project and remind students where they are in relation to the project goals. This is to remind them of what skills they need to master as well as bracing them for what grades they can anticpate afterwards.
Grading
Given the self paced nature of the class, I do a lot of my grading during the class. Not actively engaging the whole class means you can grade during the period. The biggest benefit to this is that I grade the student while conferencing with them. Each student or group is called up and I review the rubric with them alongside their code and project. After we agree to where they fall in each category we discuss their temporary grade. I say the grade is temporary because they can resubmit to achieve mastery in the approaching/not yet skill sets.
This approach has been great for several reasons. Students fully understand their grade. There's no "Why did I get a B". Students know exaclty what skill they are deficient in and the conference explains how to demonstrate mastery to me.
Final Thoughts
Now you've seen how I craft a PBL/Self Paced Learning unit from start to finish. As the year progresses I provide students more choice over projects and tech to learn based on student comfort level and interests. PBL and Self-Paced Learning allow that happen. This approach requires a lot of upfront work but I find that it makes the actual atmosphere of the class more enjoyable for me as I can focus on social-emotional support and providing more small group support.